How to install a third-party Skin Pack (CustoPack Type) of Windows 7 with confidence We shared some great skin packages for Windows 7 and a little 'are in the queue. They are without doubt one of the best ways and easy to change the whole outlook for the system, but unless you're a regular user, then you can hear some of the problems to install the packages and then safely remove and return all system files back. As I said, we have some skin in the queue to share the aggregates, so instead of typing the same thing (how to install / remove) over and over again in all subjects, we will create in this article. So get ready and enjoy the skin packs.
Pre-procedure
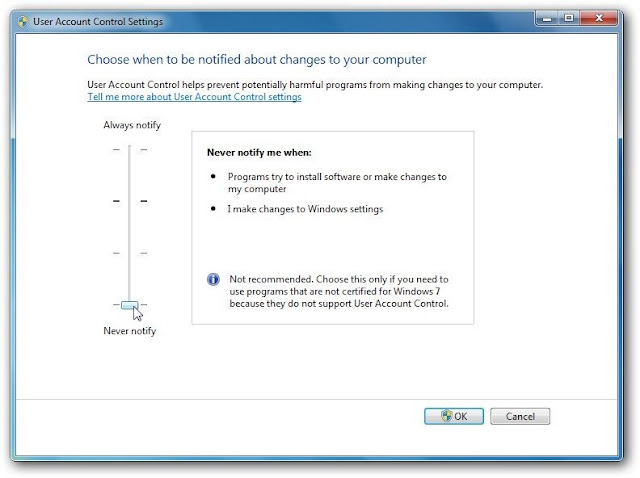
Always remember that this type of packs of skin are used to replace a large number of system files and adding new opportunities as well as software from your system. Even uninstalling them will not always all the changes back and make your system look like before (you can see the icon menu or even forgotten unsorted your system may not start.). It is strongly recommended to take an initial backup of your system so you can recover from any type of disorder. If you are not sure how to take backup of your system quickly and how to use "System Restore" safe and perfect, then you should consult our guide to "A short guide to create a system restore point and use it safely. " So, first create a manual restore point before getting into the installation. This helps to restore your computer if it is contained in a messy place. For your safety, do not skip this step. When the backup is complete, you can continue. Now we need to remove the "UAC" (User Account Control Settings). To this end, hit the Start menu, the first and search for "UAC" then click "Change User Account Control settings."
 Now to "Never Notify" option from the left. Then click OK.
 Installation CustoPack
This is an optional step, but I recommend you install it first. This tool allows you to easily control and better appearance of your system. So first download and run CustoPack. The installation wizard will begin immediately. Click Next to start this procedure.
 Now you will be shown the license agreement to use this software. Read it and then click "I Agree".
 Here we can choose how the installation. There are two modes, we continue with the standard "Quick Setup" mode. Hit Next.
 Now you can choose the destination folder for this software. Browse and select where you want CustoPack be installed. Leave intact to use the default settings.

Now we are ready to complete the installation. Click Install to start the process. This will install the software.

Skin Pack Installation
So now we are ready to install the skin package. Download your favorite and then run it by double clicking. The package installer will check the system requirements. Wait until it finishes.

Now the installation wizard starts. Click Next to continue.
 Here you can see the specifications, agreement and user requirements for Skin Pack. Read it and then put a check mark on "I accept the terms of the license agreement" and click Next.

Now you will be asked to select the method of installation of this software. There are two options with the '"Quick Setup" and "Custom Installation". If you want to change the default settings and the installation directory, select "Custom Install" and then, if not continue to "Install."
 Now select to install. Check all the options and click Install.

Now that the installation begins. Wait while it installs the software.

Display the window after the installation finished asking if you want to restart the system immediately, or you plan to restart later. Remember to reboot the machine immediately. After rebooting the system, you will receive a new Skins Pack for Windows installed in a safe manner.
Pre-procedure
Always remember that this type of packs of skin are used to replace a large number of system files and adding new opportunities as well as software from your system. Even uninstalling them will not always all the changes back and make your system look like before (you can see the icon menu or even forgotten unsorted your system may not start.). It is strongly recommended to take an initial backup of your system so you can recover from any type of disorder. If you are not sure how to take backup of your system quickly and how to use "System Restore" safe and perfect, then you should consult our guide to "A short guide to create a system restore point and use it safely. " So, first create a manual restore point before getting into the installation. This helps to restore your computer if it is contained in a messy place. For your safety, do not skip this step. When the backup is complete, you can continue. Now we need to remove the "UAC" (User Account Control Settings). To this end, hit the Start menu, the first and search for "UAC" then click "Change User Account Control settings."


This is an optional step, but I recommend you install it first. This tool allows you to easily control and better appearance of your system. So first download and run CustoPack. The installation wizard will begin immediately. Click Next to start this procedure.


Now we are ready to complete the installation. Click Install to start the process. This will install the software.

Skin Pack Installation
So now we are ready to install the skin package. Download your favorite and then run it by double clicking. The package installer will check the system requirements. Wait until it finishes.

Now the installation wizard starts. Click Next to continue.


Now you will be asked to select the method of installation of this software. There are two options with the '"Quick Setup" and "Custom Installation". If you want to change the default settings and the installation directory, select "Custom Install" and then, if not continue to "Install."


Now that the installation begins. Wait while it installs the software.

Display the window after the installation finished asking if you want to restart the system immediately, or you plan to restart later. Remember to reboot the machine immediately. After rebooting the system, you will receive a new Skins Pack for Windows installed in a safe manner.